Showing posts with label vinegar. Show all posts

11 August 2011

Irish Food!

I'm sort of Irish. I was born in Dublin and lived there for two years before moving to Australia. However, I do lack pretty much everything that pertains to Irish culture, so I don't think it makes sense to call myself Irish. Recently, I figured that I should at least learn a little about Irish cuisine. No, not American-Irish food, and not barrels-of-alcoholic-drinks Irish cuisine. I mean legitimate, daily, traditional, Irish cooking.
The internet is not really helping, funnily enough. Something I realised is that U.S. cuisine is composed of manipulations of and additions to other culture's cuisines. For instance, plain ol' sponge cake. From a simple butter-sugar-egg-flour sponge cake, the U.S. has evolved it into some seven layer sponge cake infused with peppermint oil, studded with three kinds of nuts, and sandwiched between tons of buttercream icing with sun-dried strawberries and chocolate-orange ganache and THEN topped with sprinkles and whole chunks of candy bars, AND FINALLY drizzled with a blueberry brown sugar glaze and enveloped in fondant or marzipan. I don't know. It's just that a basic recipe for the commoner gets thrown into a bucket, and comes something that is obviously not simple or traditional.

The irksome part is that it gets labelled as traditional.

So, when I was looking for a traditional Irish soda bread recipe, I found recipes that included eggs, raisins, sugar (a whole cup of sugar? ARE YOU KIDDING ME?)...and they were all labelled as "traditional" or "authentic" or whatever-the-heck. I used a recipe from here, thinking, hmm the reviews look pretty good...
...but the batter was too liquidy. It was like cookie batter, and was un-kneadable. I baked it anyway, and it tasted alright. A little moist, like an unsweetened cake, studded with pieces of dry fruit.


I did find a neat website that advocates the old fashioned soda bread and scorns the ones made with caraway seeds/sugar etc. This website, The Society for the Preservation of Soda Bread, says that the common people back then just didn't have raisins or honey or seeds or whatever exotic stuff to use in their soda bread. Well duh. So, I trusted their recipe and made a nice, doughy, kneadable round of brown soda bread, with a neat X-shaped cut at the top. Like the recipe says, there's a hollow sound when I hit the loaf with a fork. The interior is pretty dry, tastes a bit like baking soda, and is chewy. It's just like crumbly whole wheat bread, really, except that it lacks yeast. The crust, my favourite part of bread, is amazing!! So crispy!
The only problem I had with making soda bread was that I didn't have buttermilk, and I don't really see any point in buying any. For my first batch of soda bread, I needed 500 ml of buttermilk, so I just got 500 ml of low-fat milk and juiced in a lime. The bread rose, so I suppose that worked. This time, I only made half a batch of soda bread, so I used about 200 ml milk and 1 tbsp of lemon juice (we happen to have one of those plastic packets). I was freaking out that there wasn't enough acidity because the milk didn't curdle, so I threw in another tablespoon of vinegar. This batch of soda bread rose, so I guess this works too. The bubbles are pretty small and uniform, which is different from those artisan yeast-made breads, in which the holes really vary in size.

One problem, of course, is that I don't remember ever eating soda bread from Ireland. Oh well.

Knowing the way I cook, even though I intended to follow the recipe exactly, I ended up doing this (and therefore I didn't do the whole metric thing):

INGREDIENTS for one 15 cm diameter x 6 cm tall round loaf of soda bread
1.8 cups of whole wheat flour
0.2 cups of white flour
200 ml milk
25 g butter (because I used fat-free milk. If I had used whole milk, I wouldn't have included the butter)
1 tbsp lemon juice
1 tbsp vinegar
1 tsp coarsely ground salt

METHOD
1. Add vinegar and lemon juice into the milk and let sit.
2. Mix all the dry stuff.
3. Rub in butter.
4. Add the milk/vinegar/lemon juice mixture in, around 50 ml at a time.
5. Make a dough that will sort of stick together; it's okay if it's crumbly. Just knead it a little and plop it into a bowl that has been lightly greased with the wrapper from the butter or sprinkled with some flour.
6. Stick a lid on the container and put on the bottom rack of an un-preheated oven. Bake for 15 minutes at 425 degrees F.
7. Take off the lid and continue baking the bread for 15 minutes at 425 degrees F.
8. The bread's actually basically cooked now, so turn the oven off and keep the bread in the oven for about half an hour.
9. Yay!!

From now on, though, I think I'd prefer to make hand-sized rolls of bread because
1. They cook faster = lower gas bill
2. MORE CRUST!!!!!!

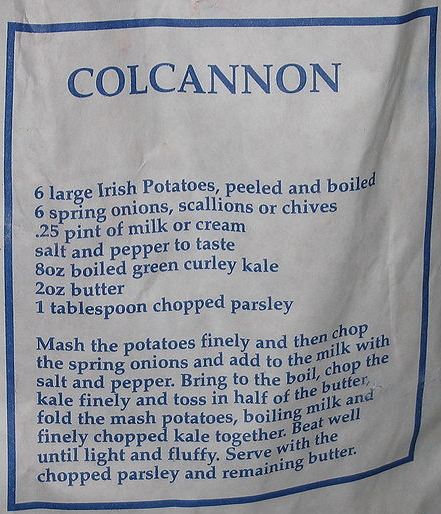
In addition to making Irish soda bread, I also made Irish Colcannon last week. I used the recipe on the back of a sack of potatoes although I used a lot more cabbage than the usual recipe calls for. I think I used about 400 g of dark green cabbage (NOT the sweet, white/light green rounds of cabbage that you find in salad mixes), since it was fresh from the garden. Actually, the potatoes were from the garden too, as were the spring onions.

09 August 2011

Marinade

Since I'm pretty much doing half the cooking in the family now (to give my mum less housework and more rest time), I figured I should learn how to cook animals. So, I've been browsing through the Costco cookbook since I figured, hey, let's just get the gist of cooking animals, right? I personally find cookbooks more useful than the internet when I'm a complete neophyte at cooking something (in this case, animal flesh). They're not for me to follow, though. They're just kinda... there. As a guideline. Something for me to manipulate.

I've never made any marinades before. Today, however, I made dinner and I made some sort of stove-top grilled tofu with this sweet and sour fruity marinade. To appease the rest of the family, I also made stove-top grilled pig flesh (pork chops) with the same marinade. Apparently, 1 cm-thick pork chops cook pretty quickly, and I overcooked the first three chunks (I mean, how was I supposed to know whether they were cooked or not? I can't taste test them...), but they were still edible. The rest of the chops turned out fine, though.

My mum and brother definitely liked the marinade. Although my brother didn't comment much (he did say they were "juicy" though, and he couldn't figure out what sort of marinade it was), I felt really pleased because his fork kept transporting chunks of pork chop to his bowl. My sister responded to this new dish by saying "Eww", which is the norm. The only comment from my dad was that it needed more salt. Meh. I wonder how it's like when I'm not at home. *Here comes the bitter snide comment* I wonder if my dad would cook dinner if I hadn't been home today. My mum had to take my sister to a party today, and didn't get back until 8 pm (which is literally when I finished stir frying the bak choi - I started making dinner around 7), and my dad was just watching TV, and he'd been home for half an hour. I mean, would everyone wait until 9 for dinner?

Anyway. To get the general gist of a marinade, I read the recipe from page 105 of Favorite Recipes The Costco Way 2007. It's a recipe by Paula Deen called "Pork Chops with Ragout" which isn't that great of a title in my opinion because in translation it's "Pork Chops in Sauce". My marinade is extremely loosely based off of Paula Deen's recipe, there is no butter in it. At all. Funny, huh?

INGREDIENTS
A.
Small clove of garlic
60 g onion
100 g (~1.5 stalks) of celery
4 leaves fresh basil!

B.
1 tbsp oregano
1 tbsp coriander
5 cut dried juniper berries
1 tsp nutmeg
Salt
Pepper

C.
150 ml apple juice
70 ml balsamic vinegar
2 tbsp vinegar
2-3 tbsp olive oil
Juice of one lime

D.
1 kg marinade-able objects (in this case, half tofu and half boneless pork chops in two separate containers)

E.
1 tbsp all purpose flour

METHOD
1. Finely chop stuff in Group A.
2. Mix stuff in Group A, B, and C together, in a container with a lid. It will be liquidy.
3. Cut marinade-able objects into pieces that are about 1 cm thick. For tofu, a thickness of 0.5 cm is better. Stick objects into marinade.
4. Leave container in a fridge for at least 4 hours.
5. FOR TOFU: Cook marinaded tofu in a frying pan on medium heat, uncovered, for 3-4 minutes on each side. If you like crunchy, burned exteriors, 5 minutes on each side is pretty nice too.
FOR PORK: Plop pieces onto the frying pan on medium heat, and cover for 1-2 minutes. Flip. Cover for 2-4 minutes. Keep uncovered and check frequently for doneness. This is quite difficult if one doesn't actually eat pork...
Remember: Sizzling is good.
6. Promptly remove marinated objects from frying pan, and scrape all the leftover marinade into the frying pan.
7. Stir (with the same spatula you've been using) on medium heat. When the marinade starts to bubble, add in E. (1 tbsp flour). Continue stirring until you end up with a thick sauce.
8. Pour sauce onto marinated objects and eat!!

I didn't take a picture of the pork chops but if I would say that they had neat grilled-ish exteriors and were squishy. They looked pretty fantastic on the inside too.

The marinated tofu tasted pretty good...it wasn't sweet enough for my liking, though. Still, I had leftover marinade so I marinated more tofu! :)

15 July 2010

Pasta Salad!

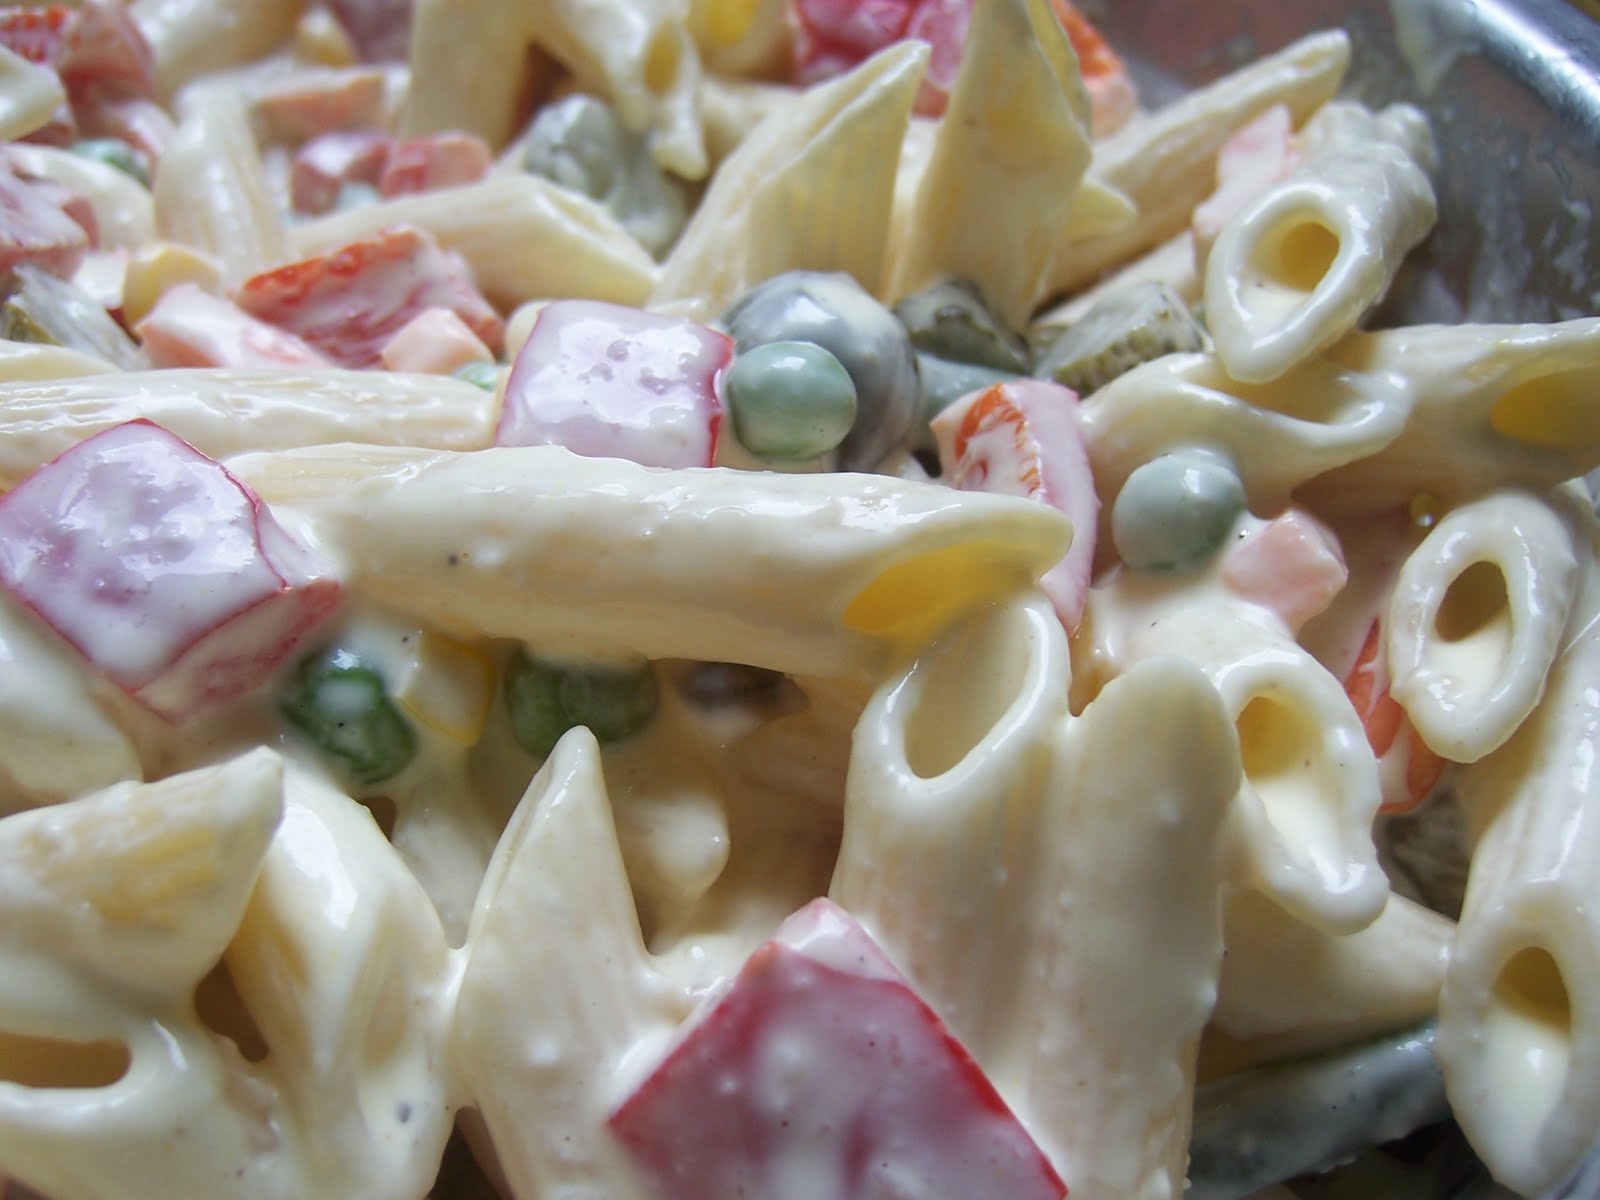
I'll talk about chocolate some other time. Today, I actually felt like cooking so I made lunch. There are actually only 17 pieces of penne left. This is amazing because there are always tons of leftovers. [I mean, we always have leftover pasta and rice. No matter what.] Plus, my mum and brother genuinely like[d] what I made today though my brother didn't like the pickles part.

Anyway, a few weeks ago I found this recipe and the pictures were really pretty, so I decided to emulate it. In truth, I have never really had legit pasta salad. Okay, in year 7 and 8 there were these days I bought macaroni + mayo + tuna, which I suppose constitutes pasta salad. However, today's salad was LEGIT!
Tweaking The Luna Cafe's ingredients and method...

Stuff you need:
1 box/lb of penne
A chunk of frozen cut vegetables from an even larger chunk of frozen vegetables.
0.5 cups of cut up pickles
1 red bell pepper

Dressing:
1.5 cups mayo
0.5 cups low-fat milk
3 tbsp vinegar
Juice of one lemon
Pepper, salt, garlic powder [a LOT!]
1 big spoon of mustard.
Method:
1. I think the ingenuity of The Luna Cafe was that the boiling water used to cook the vegetables was then used to cook the pasta, because the vegetables were taken out using a strainer. I honestly think this is SUCH a cool idea.
2. Boil vegetables until they are soft and look cooked.
3. Make pasta and drain and let it sit there until it cools down. Don't use too much water draining it. While the pasta is cooking, cut pickles and red bell pepper.
4. Mix all the stuff in the dressing ingredients list.
5. Mix everything together.

Yes, the dressing does look rather unappetising. I just put it here so that you know you're doing the right thing. The powdery stuff is garlic powder since we don't have actual garlic.
The dressing looks delectable now :P


By this time, the pasta salad actually tasted good, except that there was wayyyy too much dressing. I somehow managed to coat all the pasta and vegetables using just half the dressing. I ended up dumping the other half in anyway, though, because, like chocolate, I suppose you can't have "too much". Though, apparently semolina likes to soak up liquid, so right now, 4 hours later, the liquid has, er, apparently decreased. I can't really tell, since there are only 16.5 pieces of penne left.

I just taste tested half a piece of penne and I have to say that this time, the penne piece tastes like it was made with the soury-fatty dressing INSIDE the semolina. Earlier, when it was just cold, you could clearly distinguish between the pasta and the dressing. Now, the dressing and pasta have formed a glutinous-y conglomeration of awesomeness. An analogy would be
bread in a pan + egg in a pan = fried egg on toast.
but
bread soaked in egg overnight = eggy bread [more commonly known as "French toast" in the U.S]

This was delicious pasta salad, since you could definitely taste a sourness and tangy-ness that comes only in PASTA salads! In retrospect, if I made the dressing more vinegar based rather than mayo based, I probably would get something completely different, [vinaigrettey salad?] which I would like to try out actually, since it would be healthier. [NEVER, EVER, EVER, use low fat or fat free mayo. It's crap in a jar. No kidding.]

11 July 2010

Berry Jam!


Basically, gooseberry jam...

...with strawberries, and raspberries, and kiwi, and tomatoes. Oh, and balsamic vinegar. This is the third summer in which I've made jam. The first summer, I made this blackcurrant jam that was wayyyy too dry. In other words, it congealed while the fire was still on, so by the time it had cooled, it had turned into a really-gummy-almost-dried-blackcurrant consistency. It was also really sour. Last year, I think I made three batches of jam [two currants, one gooseberry], which all turned out really lovely. This year, all our blackcurrants and red currants appear to have died, due to the climate characteristic of a summer on drugs. So, all we have now are raspberries and gooseberries. Actually, we're losing those too. Anyway, I salvaged about 4 cups of gooseberries, a few raspberries, and decided to make some jam, since my family isn't really in love with fresh gooseberries.

To make the jam:
4 cups of gooseberries [yay pectin!]
1 cup of sugar [which was way too much. Hence, I added all the other fruit too. Then again, I don't really like sickly-sweet jams, so maybe it's okay for other people]
0.5 cups of water
10 or so cherry tomatoes, cut in half
1 kiwi without seeds or white centre [my brother wanted to add this]
5 or so cut up strawberries.
4 tbsp balsamic vinegar [complements the strawberries very well, both taste-wise and SMELL-wise]1. Add gooseberries and sugar and balamic vinegar. The vinegar, I suppose, helps preserve the jam, meaning that we don't need to use lemon juice or another acid. In all honesty though, the sugar and gooseberry's acidity should preserve the jam well too. Stir mixture. Realise that there is wayyyyy too much sugar - see image above. All that goop is sugar. [A fine coating of sugar on each berry should be enough. A freakin' snowstorm is... too much for me].
2. Add water and other fruit.
3. Stick it on high on the stove until it starts to boil.
4. Add more fruit if it still looks/taste too sweet.

5. Start mashing the berries. Technically, the tomato is a berry. And, to astound you more, the kiwifruit is ALSO a berry! So, yes, I made berry jam today.
6. Turn down to the stove to low heat, and the mixture should be simmering. Stir every once in a while [this works best in a nonstick pot] for 45 minutes or so.

7. Check every once in a while by dropping a tad of it onto a dry plate and letting it sit there, and see whether it congeals. This is also a great time to taste the jammy syrup, because you want to know whether it's too sour/sweet.
Note the tomatoes - orangey.
8. Turn off heat. Let it sit for a while. Then, pour into jars. I got about...900g? Well, three chili-sauce jars full. Evidently, chili sauce has a different density than berry jam, so the yield is probably 1 kilo of jam.


We didn't have any bread so I spread some on man[2] tou[2] that my mum made a few days ago. You should put all remaining jam in the fridge. It keeps for at least a month. I don't know beyond that because we, as a family of 5 [well, temporarily 6] usually consume it all within that time.
Taste? Starts off soury-sweet, almost like candy. The gooseberry and strawberry flavour is initially very prevalent [NOT the store-bought strawberry jam taste, though!!], and ends in a slight tomato taste [think a tiny touch of tomato sauce]. There is no kiwi taste, even though my brother, who had insisted we stick in a kiwi, insists that there is a tang of kiwi. Texture-wuse, the skin from the berries and tomatoes and such are surprisingly a great addition. I find it amazing that the kiwi and strawberry chunks appear to have melted [even though they're just mushed]. ENJOY Jammmmmmin' EVERYONE!